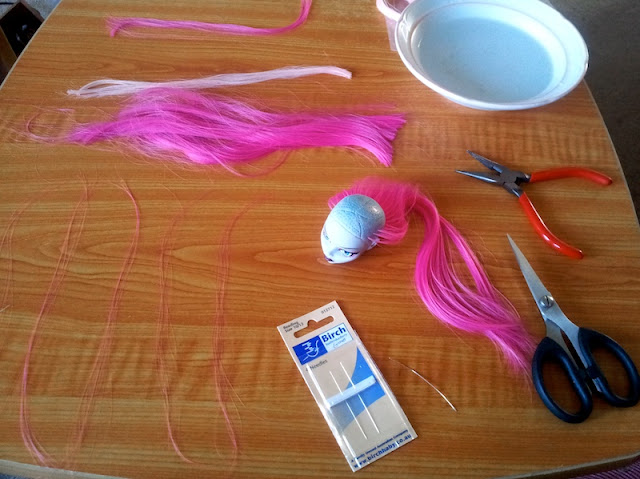
As you can see I am halfway through here. To start you will need to remove the existing hair. Take her head off by pulling, twisting and squeezing it gently. It may take some time, but be patient and gentle, you don't want to break the peg which connects the head to the body.
Cut her hair off as short as possible, then remove the plugs (and glue) from the inside of her head using needle-nosed pliers. Again, be patient and gentle, so as not to damage the head. There is a lot of glue in there!
Cut her hair off as short as possible, then remove the plugs (and glue) from the inside of her head using needle-nosed pliers. Again, be patient and gentle, so as not to damage the head. There is a lot of glue in there!
Alright, you have a clean, bald head, and are ready to start your reroot. I'm not sure of the best direction to work in, but I have started from the back of the head, working towards the front. I have left the edges (where the plugs are closer together) until last.
Here is what you will need to get to work:
- Saran hair, cut to length. Don't cut it too short - I have cut my skeins into quarters, I wouldn't want it any shorter than that. I seperate a few bunches of saran ahead of time to help me work more quickly.
- A small bowl of water. Wetting the saran makes it easier to work with.
- Needle-nosed pliers
- Scissors
- Needles. I am using beading needles, size 10/13. I have snapped one already and think you should have about 4 or 5 at hand, just in case.
- Thimble (not pictured). If you are comfortable with thimbles it may be wise. I don't like to use them, but my right index finger is getting shredded as the water is making it soft and the tiny needles are very pointy!
Rooting a plug:
- Thread the needle with a few strands of saran (5 to 8 strands, no need to be fussy). Wetting the saran will make it easier to thread.
- Put the needle through a plug hole and out through the neck. Using the pliers will make it easier to pull the needle out. Don't pull the hair all the way through!
- Remove the needle and tie a knot in the saran. Wetting the saran also makes this part easier. (This step it pictured to the left.)
- Now pull the hair back through from outside the head untill the knot hits the inside of the head.
You have rooted one plug! Now continue over and over for several hours. Hahah.
To the right, I made a little video on my phone showing how I complete one plug, demonstrating the method described above.
After all the plugs are filled I will need to spread some craft glue around the inside of her head and allow to dry overnight (standing right-way-up) before putting the head back on the body.
I hope this was helpful. I'll be sure to post pictures when I am finished, along with styling tips.
- Kat
*edit* I will be editing this post soon with additional information. One note to add is that I buy my hair from dollyhair.com . Also that upon starting a new reroot I notice that thermal saran is a lot coarser than regular saran, so I would recommend more than 8 strands per plug. Anyway, please check back for an updated tutorial next week. - Kat


Thanks!! Very well explained! I like very much your dolls. Blessings from Spain. :)
ReplyDeletethank you for this great tutorial! i just bought my first mh girl, a dt draculaura, and i'm planning on re-doing her hair :) i love the final product, you did a great job!
ReplyDeleteThanks Libby! Good luck with your reroot. It takes time, but it is SO worth it. ^_^
DeleteWow, love this tut. Ty from Brazil
ReplyDelete